FTC modular water tanks are a staple in water storage solutions across industries, renowned for their versatility, durability, and ease of installation. Whether it’s for industrial, agricultural, or municipal use, these reliable water tanks provide robust storage capabilities with tailored configurations.
In this article, we will cover the entire installation process for FTC water storage tanks, emphasizing preparation, assembly, and quality assurance. By following this step-by-step guide, installers can ensure a seamless process, resulting in a fully operational and efficient water storage tank.
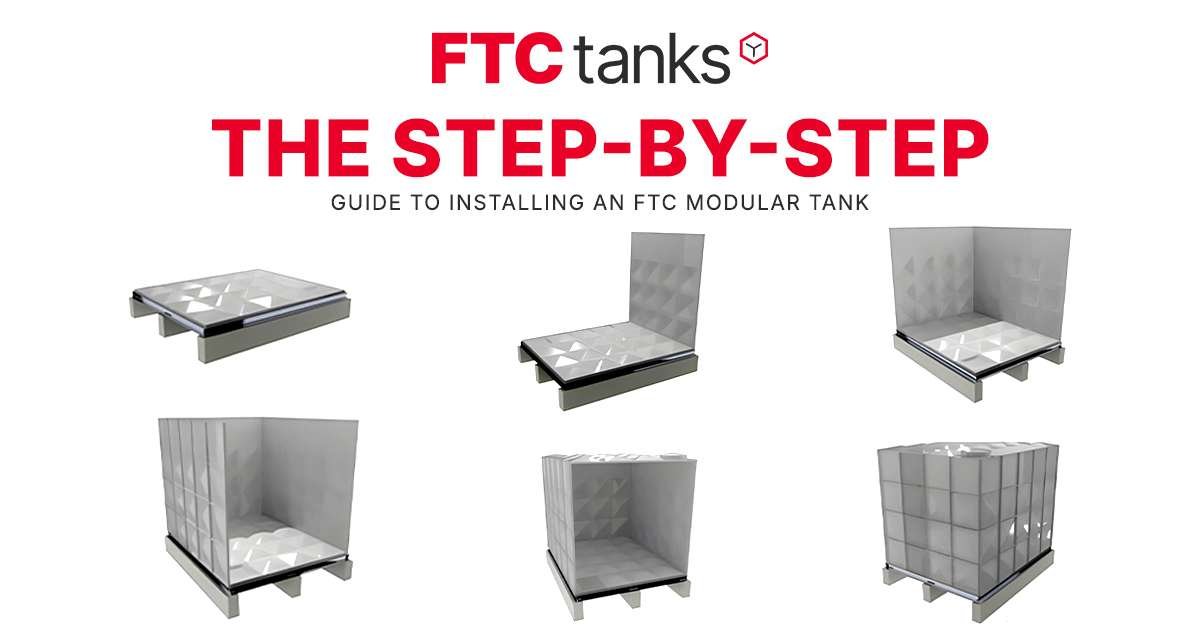
Steps to Installing an FTC Modular Tank
Below, we break down the key stages of water tank installation to help you achieve a seamless and successful setup.
Step #1 – Preparing for Installation
The foundation of any successful project lies in preparation. Installing an FRP water tank begins long before the first panel is laid. Proper site preparation, tool readiness, and component verification are the initial steps that set the stage for a smooth process.
Tools and Materials
The tools and equipment required for installation vary based on the cistern’s height, type (internally or externally reinforced), and additional features. Commonly required tools include:
- Measuring Devices: Levels, tape measures.
- Impact Gun and Sockets: For securely tightening the bolts (e.g., M12, M18) as specified in the manual.
- Scissors: To accurately cut Sealant S and Sealant C for watertight seals.
- Power Drills: For connecting flanges and corner accessories.
Having all tools readily available prevents delays and ensures compliance with installation specifications for these weather-resistant tanks.
Site Inspection
- Foundation Readiness: The concrete slab or beams must be verified for compliance with the drawings. Key parameters include width, length, and height tolerances. Uneven surfaces should be corrected using shims or grouting.
- Accessibility: Sufficient clearance (2 feet around the cistern and 3 feet above the manhole) ensures that the site is conducive to efficient water tank installation and long-term maintenance.
Unpacking and Inspection
Unpack all water storage tank components and cross-reference them with the packing list. Missing or damaged items must be addressed before proceeding. Familiarizing yourself with the components—such as side panels, roof panels, internal tie rods, and external bracing—streamlines the assembly process.
Step #2 – Setting Up the Steel Footing
The steel footing acts as the cistern’s foundation, transferring weight evenly to the ground or beams. It must be precise and sturdy to support the water-holding tank over its operational lifetime.
- Pedestal Steel Footing: When using a pedestal steel footing, ensure the slab is flat or levered. Use shims to adjust for unevenness, ensuring deviations do not exceed 1/8″. The footing can be secured to the slab using anchor bolts.
- Concrete Curbs or Steel Beam Footing: Concrete curbs are commonly used as footings; however, they can be replaced with W14 or W18 steel beams. Both curbs and beams must be aligned and leveled according to the shop drawings. Verify diagonal measurements to ensure right angles between the beams, which are essential for the structural stability of the plastic water tank
Proper footing ensures the FRP water tank structure remains secure under full load, avoiding long-term issues like structural shifts or leaks.
Step #3 – Installing Bottom Panels
The bottom panels form the base of the fiberglass water tank, providing a watertight foundation for water storage. Proper assembly techniques are crucial to maintaining structural integrity.
- Layout and Cleaning: Arrange bottom panels according to the layout in the installation manual. Clean the contact edges thoroughly to remove debris or grease.
- Sealant Application: Apply Sealant S along the panel edges, ensuring consistent coverage.
- Patch Installation: Use Patch B at panel corners for added waterproofing.
- Panel Connection: Align panels and join them using M12 bolts, nuts, and washers. Tighten the connections to the recommended torque, ensuring no gaps in the joints.
Repeat this process until all bottom panels are connected, leaving a smooth and sealed surface ready for the side panels.
Step #4 – Assembling the Side Panels
Side panels are integral to the cistern’s structural stability, and their assembly must follow precise steps to ensure durability and leak prevention.
Starting at the Corners
Begin with a corner panel to establish a sturdy framework. The corner panel acts as a guide for connecting subsequent panels.
Joining Panels
- Clean panel edges and apply Sealant S to both flanges.
- Use Patch T on the lower corners and Patch B along the sides.
- Secure panels with frame angles and bolts, tightening washers and nuts to ensure alignment.
For taller water tanks (above 2.5 meters), internal tie rods or external bracing must be installed concurrently to provide stability and support.
Step #5 – Installing Roof Panels
Roof panels protect the industrial storage tank’s contents and provide structural integrity against environmental factors like wind and precipitation. Their installation requires attention to detail.
Pre-Assembling Panels
Lay roof panels flat on leveled ground. Clean the flanges and apply Sealant C before connecting them with M12 bolts and washers.
Installation
- Lift the pre-assembled roof panels.
- Position them on the cistern, securing them to side panels using brackets and bolts.
- Install roof support pipes and plates to distribute weight evenly across the structure.
If the water reservoir cistern includes accessories like manholes, ensure they are installed and sealed during this phase.
Step #6 – Installing Reinforcements
Reinforcements depend on the cistern type and height. For externally reinforced water storage containers, bracing beams and tie rods provide additional stability. Internally reinforced reservoir tanks rely on tie rods positioned strategically between panels.
External Bracing
- Position bracing beams and secure them to the brackets welded on the steel footing.
- Connect tie rods to the bracing beams and secure them using washers and nuts.
Internal Reinforcements
Tie rods are connected between side panels to distribute pressure evenly. Follow the installation drawings to ensure correct placement and alignment.
Additional Steps for Building Stability and Securing Longevity
Ensuring the durability and reliability of your fiberglass water tank goes beyond basic installation. Here’s how you can safeguard the tank’s performance and structural integrity for years to come.
Accessorize
Accessories enhance the cold water tank’s functionality and usability. Install these components during or after roof panel assembly.
- Inlets and Outlets: Drill holes as per the provided layout for flanges and anti-vortex devices.
- Ladders: Attach internal and external ladders using brackets and bolts for safe access.
- Water Level Indicators: Install gauges for real-time monitoring of water levels.
- Overflow and Drainage Systems: Ensure these are installed and sealed to facilitate proper water flow.
Address Seismic Considerations
In seismic-prone areas, fiberglass water tank installations must adhere to stricter guidelines to prevent structural failures. Panel heights are restricted to 5 meters, and additional reinforcements may be required. Consult the FTC seismic installation guidelines for specific instructions.
Conduct Final Quality Checks
Before declaring the water reservoir cistern operational, perform a comprehensive inspection:
- Seals and Connections: Verify all seals, bolts, and patches for tightness and consistency.
- Reinforcements: Ensure all tie rods and braces are secure.
- Leveling: Recheck the levels of the footing, panels, and roof.
A water test can be conducted to ensure there are no leaks. Fill the FRP water tank gradually, monitoring for any signs of leakage or structural stress.
Maintenance and Future Considerations
Proper maintenance extends the life of the sustainable water storage cistern and ensures optimal performance. Regularly inspect seals, bolts, and reinforcements, especially after extreme weather events or seismic activity.
Common Installation Challenges and Solutions
Installing leak-proof water tanks can be a straightforward process when guidelines are followed correctly. However, certain challenges may arise during installation. Identifying these issues early and applying the right solutions can save time and effort while ensuring a successful setup. Below are some common challenges and practical solutions for addressing them:
Challenge: Uneven Foundation or Slab
An uneven foundation can cause misalignment of the steel footing and panels, leading to stability and sealing issues.
Solution:
- Before installation, verify the flatness of the slab or beams using a level.
- Use steel shims (4×4 inches) in 1/16″ or 1/8″ increments to adjust for deviations.
- For larger inconsistencies, apply concrete grouting or cutting to level the surface.
- Ensure deviations do not exceed 1/8″, 1/4″, or 3/8″ based on the tolerance limits specified in the FTC manual.
Challenge: Misaligned Panels During Assembly
Improperly aligned panels can lead to gaps in connections, compromising the FRP panel-type tank’s structural integrity and watertightness.
Solution:
- Start assembly from a corner panel to create a strong and stable framework.
- Use frame angles and bolts to secure each panel before proceeding to the next.
- Continuously check alignment using a level as panels are added.
- Reposition panels immediately if alignment issues are noticed, tightening bolts incrementally to secure them in place.
Challenge: Gaps in Panel Connections
Gaps between panels may occur if Sealant S is not applied evenly or bolts are inadequately tightened.
Solution:
- Remove the affected panels and clean the surfaces thoroughly to remove dust, debris, or dried sealant.
- Reapply Sealant S generously along the flanges, ensuring full coverage.
- Tighten bolts to the specified torque to secure the connection and eliminate gaps.
- Perform a visual and physical inspection of each connection before proceeding with further assembly.
Challenge: Difficulty Leveling Roof Panels
Roof panels can become uneven if the side panels are not perfectly aligned or the roof support pipes are misplaced.
Solution:
- Use temporary supports during roof panel installation to ensure even positioning.
- Mark roof support pipe locations clearly on the bottom panels using the provided layout drawings.
- Verify the alignment of roof panels with the side panels before finalizing connections.
Challenge: Sealant Drying Prematurely
Sealants like Sealant S and Sealant C can dry out quickly in hot or dry environments, reducing their effectiveness during assembly.
Solution:
- Apply sealants immediately before connecting panels to prevent premature drying.
- Work on smaller sections of the insulated water tank to maintain efficiency and ensure seals remain tacky during assembly.
- Store sealants in a cool, shaded location to preserve their quality.
Challenge: Improper Bracing Installation
For externally reinforced storage cistern, incorrect placement of bracing beams or tie rods can compromise the cistern’s stability.
Solution:
- Follow the reinforcement drawings provided in the installation manual for exact bracing positions.
- Use lifting equipment to position bracing beams and secure them with bolts and washers.
- Cross-check all tie rod and brace connections for tightness and alignment before proceeding to the roof installation.
Challenge: Limited Access to Tighten Bolts
In a confined space water tank, securing bolts and washers can be difficult, leading to incomplete connections.
Solution:
- Use specialized tools like long-handled wrenches or torque extensions to reach confined areas.
- Assemble panels in a sequence that minimizes the need to reach inaccessible areas, leaving open sections for easier maneuvering.
Challenge: Leakage During Water Testing
Post-assembly water testing might reveal minor leaks, especially around panel joints or inlet/outlet flanges.
Solution:
- Identify leak points and mark them for correction.
- Tighten bolts in the affected area, ensuring they are at the recommended torque.
- Apply additional Sealant S around the joint or flange.
- Allow the sealant to cure fully before retesting the algae-free water storage cistern.
By proactively addressing these challenges, installers can streamline the setup process and ensure that seismic resistant tanks perform efficiently and reliably. Proper preparation, adherence to the installation manual, and regular water cistern maintenance are critical to overcoming these common obstacles.
Upgrading and Expanding Existing Tanks
FTC’s bacteria resistant tanks stand out for their adaptability, allowing for easy modifications as storage needs evolve. Whether it’s increasing capacity or enhancing functionality, these high-capacity water tanks offer unmatched flexibility and cost-efficiency.
- Increasing Capacity: Add panels to expand the cistern’s height or footprint. This involves disassembling the roof and side panels, introducing new sections, and reinforcing the structure with tie rods or external bracing.
- Upgrading Accessories: Components like ladders, handrails, level gauges, and drainage systems can be upgraded to meet changing requirements, such as improved safety, monitoring, or faster drainage.
- Enhancing Stability: For larger bulk water tanks, additional bracing or tie rods can be installed to ensure structural integrity, especially in seismic zones.
- Repurposing and Relocation: Cisterns can be customized for new applications, such as rainwater harvesting, and easily relocated or reconfigured to suit different sites.
This adaptability reduces costs, minimizes downtime, and supports sustainability, ensuring that these corrosion-resistant tanks remain valuable assets for years to come.
The Bottom Line
FTC modular cisterns exemplify efficiency, versatility, and reliability in water storage solutions. Whether you’re installing a new cistern, upgrading an existing one, or addressing site-specific challenges, their modular design and robust engineering ensure adaptability for any application. By following the steps and guidelines outlined in this guide, you can achieve a seamless installation process and long-term performance.Ready to experience the unparalleled benefits of FTC custom water tanks? Contact FTC Tanks today to learn more about our low-maintenance water storage solutions and how they can meet your specific needs!